DeBank Testnet RPC – Chain Settings, Basics & How to Add to MetaMask
login debank
DeBank Testnet RPC and Chain Settings
How to add DeBank Testnet RPC to MetaMask via Metaschool RPCs?
Before adding your network, you will need to have MetaMask set up on your web browser or phone. If this is your first time, check out this easy guide on installing MetaMask
There are two ways to do this – the easier way is to add DeBank Testnet RPC via Metaschool by clicking on the “Add to MetaMask” button below. The second way is to add manually. Steps for both have been detailed below.
Kickstart your Web3 developer journey
🖼 NFT on completion 🕰 Self Paced Learning 🤝 Strong Community
Take a Course Trusted by 140K+ developers
Add DeBank Testnet on the MetaMask app manually
If you are not able to do it, here is a manual way.
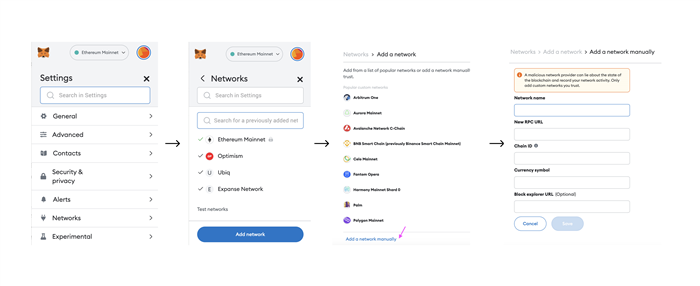
Steps to Add DeBank Testnet to MetaMask manually
- We will use the above mentioned information on Network name, RPC URL, Chain ID and Currency Symbol to add the network manually.
- Open MetaMask.
- Go to the top right circle icon, find where it says Settings, click on it. Now located where it says Networks, select that and click on where it says “Add Network” .
- You will be redirected to another page listing down several networks. If you don’t find your chosen network there, scroll down to the bottom of the page where it says “Add a Network Manually” . Click on it.
- You’ll be taken to a page that asks for Network Name, RPC URL, Chain ID and Currency Symbol. You can skip out the Blockchain Explorer field.
- Copy the values from the box above and paste them in the empty fields. Then hit “Save” . You will have successful added your choice of network to MetaMask manually.
- The success message will ask you to switch to your successfully added choice of network. Switch to it and when you can check on the top middle of the app, your network will be added.
How to switch networks on MetaMask
Switching networks can be important because only a few interoperable tokens exist in crypto today. Because MetaMask was essentially created to interact with the Ethereum blockchain, it has Ethereum as a default network wallet when you first download MetaMask.
Steps to switch networks on your MetaMask wallet

- Open your MetaMask Wallet extension/appp. Click on the mid top of the app where it mentions your default network i.e. Ethereum Mainnet.
- Drop down and select your choice of network.
- The wallet will load for a moment and connect you to your choice of network.
Why is DeBank Testnet not showing on MetaMask?
Not all networks are automatically listed on the MetaMask interface. This is because the app only displays networks that are commonly used by the community.
If you want to add a network that is not listed on MetaMask, you can add it **manually or via Metaschool** by following the steps mentioned earlier. Just make sure to carefully enter the correct details for the network.
Does MetaMask support multiple chains?
Yes, MetaMask supports multiple chains or networks, including Ethereum, Binance Smart Chain, Polygon, and many more. When you create a new MetaMask wallet, it is automatically set up to work with the Ethereum network. However, you can easily switch between different networks by selecting the network you want.
In addition to the default networks, you can also add custom networks to MetaMask by providing the network’s details such as the network name, RPC URL, chain ID, symbol and block explorer URL as mentioned above. This allows you to use MetaMask with other blockchains that are not listed by default.